pulsar负载均衡

一、动态分配

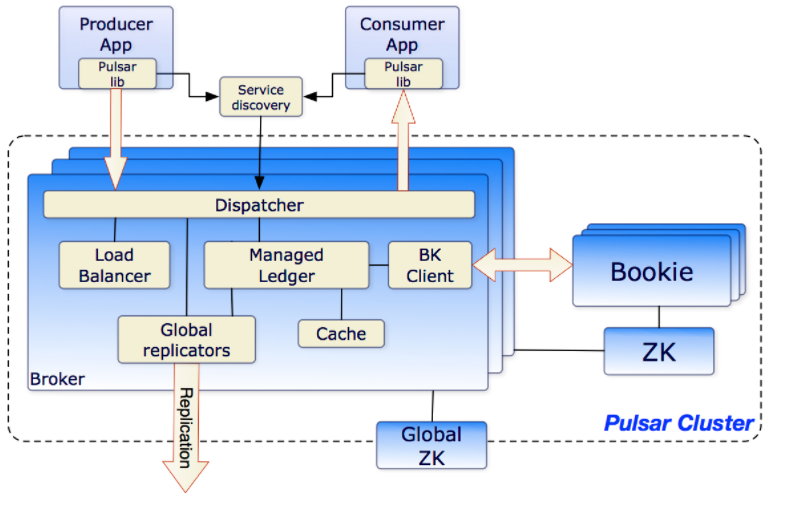
pulsar本身是集群部署的,每个集群包含多个broker。当创建新的topic时,会根据各个broker的负载情况,选择一个相对空闲的broker节点负责新topic的消息发布和订阅。如果某个broker的负载过高或者broker挂掉,也会重新进行topic的分配。从而确保整个集群在一个相对均衡稳定的情况下运行。

整个分配过程是自动的,不需要外部干预。

而且,由于broker只负责接收和发送消息,不负责消息持久化,所有broker本身是无状态的,使得broker的管理和topic分配都变得相对简单。

二、bundle

topic是消息发布订阅的最小粒度,在某些情况下会被频繁的创建、销毁,所有如果按照topic的粒度进行负载均衡会增加难度。因此,pulsar选择在namespace和topic之间虚构一层bundle,然后把topic分配到各个bundle中,以bunlde为粒度进行负载均衡。

默认情况下,一个namespace创建后会分配4个bunlde,每个bundle负责一个数字区间范围(0 - 0xFFFFFFFF),当有新的topic创建后,会对topic取hash,然后根据hash值把topic分配到某一个bundle下。

# 当命名空间创建时没有指定 bundle 数量时,将使用这个默认的值。defaultNumberOfNamespaceBundles=4

每个bunlde会被分配到一个broker上,需要重新分配时,会对整个bunlde进行移动。

bunlde的设置方式:

# 创建ns2,设置bundle个数为16
./pulsar-admin namespaces create tenant_vv/ns2 --bundles 16
# 查看bundle个数
./pulsar-admin namespaces bundles tenant_vv/ns2{ "boundaries" : [ "0x00000000", "0x10000000", "0x20000000", "0x30000000", "0x40000000", "0x50000000", "0x60000000", "0x70000000", "0x80000000", "0x90000000", "0xa0000000", "0xb0000000", "0xc0000000", "0xd0000000", "0xe0000000", "0xf0000000", "0xffffffff" ], "numBundles" : 16}

三、bundle拆分

通过hash方式可以把topic分配到某一个bundle上,通过增加bundle个数可以尽可能的让topic分配到不同的bundle上,从而让整个负载结果相对均衡。但如果topic的hash都很接近,或者一个bundle上topic的消息量特别大, 就会造成这个bundle压力过大,从而也造成处理该bundle的broker压力过大。

所以,pulsar支持对bundle进行拆分,拆分后的bundle会被重新分配。可以在conf/broker.conf中设置bundle拆分策略,具体如下:

# 启用/禁用 自动拆分命名空间中的bundleloadBalancerAutoBundleSplitEnabled=true# 启用/禁用 自动卸载切分的bundleloadBalancerAutoUnloadSplitBundlesEnabled=true# bundle 中最大的主题数, 一旦超过这个值,将触发拆分操作。loadBalancerNamespaceBundleMaxTopics=1000# bundle 最大的session数量(生产 + 消费), 一旦超过这个值,将触发拆分操作。loadBalancerNamespaceBundleMaxSessions=1000# bundle 最大的msgRate(进+出)的值, 一旦超过这个值,将触发拆分操作。loadBalancerNamespaceBundleMaxMsgRate=30000# bundle 最大的带宽(进+出)的值, 一旦超过这个值,将触发拆分操作loadBalancerNamespaceBundleMaxBandwidthMbytes=100# 命名空间中最大的 bundle 数量 (用于自动拆分bundle时)loadBalancerNamespaceMaximumBundles=128

四、broker过载检测

broker会根据cpu、网卡流量和内存判断是否过载,如果broker过载了,则会卸载上边的一些bundle。关于自动卸载的配置项:

# 启用/禁用自动负载拆分
loadBalancerSheddingEnabled=true
# 负载切分时间间隔。Broker 定期检查,是否有一些流量需要从一些负载比较高的 broker,转移到负载较低的 broker 上。
loadBalancerSheddingIntervalMinutes=1
# 防止同一个主题,在同一个时间窗口,被多次迁移的时间间隔。
loadBalancerSheddingGracePeriodMinutes=30
# 使用阈值确定 broker 是否过载
loadBalancerBrokerOverloadedThresholdPercentage=85
# 覆盖自动获取的网卡最大速度
# 此选项在某些环境中是有用的(例如:EC2 VMs) ,因为Linux报告的网卡最大速度不是 broker 真实的值。
# 因为负载管理器是根据网络使用情况来判断 broker 是否负载,为了确保信息是正确的,你可以通过这个参数来指定正确的值。这个配置值可以是一个 double 类型的值(比如: 0.8)。
# 能够通过这个配置项在网卡带宽使用完之前,触发负载切分操作。
loadBalancerOverrideBrokerNicSpeedGbps=

五、相关代码处理逻辑

关于负载均衡的代码在com.apache.pulsar.broker.loadbalance包下。

1. PulsarService服务启动后,会初始化负载均衡的模块

protected void startLeaderElectionService() {
this.leaderElectionService = new LeaderElectionService(coordinationService, getSafeWebServiceAddress(),
state -> {
if (state == LeaderElectionState.Leading) {
LOG.info("This broker was elected leader");
if (getConfiguration().isLoadBalancerEnabled()) {
long loadSheddingInterval = TimeUnit.MINUTES
.toMillis(getConfiguration().getLoadBalancerSheddingIntervalMinutes());
long resourceQuotaUpdateInterval = TimeUnit.MINUTES
.toMillis(getConfiguration().getLoadBalancerResourceQuotaUpdateIntervalMinutes());
if (loadSheddingTask != null) {
loadSheddingTask.cancel(false);
}
if (loadResourceQuotaTask != null) {
loadResourceQuotaTask.cancel(false);
}
// 启动两个定时任务
loadSheddingTask = loadManagerExecutor.scheduleAtFixedRate(
new LoadSheddingTask(loadManager),
loadSheddingInterval, loadSheddingInterval, TimeUnit.MILLISECONDS);
loadResourceQuotaTask = loadManagerExecutor.scheduleAtFixedRate(
new LoadResourceQuotaUpdaterTask(loadManager), resourceQuotaUpdateInterval,
resourceQuotaUpdateInterval, TimeUnit.MILLISECONDS);
}
} else {
if (leaderElectionService != null) {
LOG.info("This broker is a follower. Current leader is {}",
leaderElectionService.getCurrentLeader());
}
if (loadSheddingTask != null) {
loadSheddingTask.cancel(false);
loadSheddingTask = null;
}
if (loadResourceQuotaTask != null) {
loadResourceQuotaTask.cancel(false);
loadResourceQuotaTask = null;
}
}
});
leaderElectionService.start();
}

2. 负载均衡管理器选择

pulsar提供了默认的负载均衡器,同时也支持自定义负载均衡策略。负载均衡管理模块LoadManager的初始化代码如下:

static LoadManager create(final PulsarService pulsar) {
try {
// 如果配置文件中指定了自定义的均衡管理器,则使用自定义的。
final ServiceConfiguration conf = pulsar.getConfiguration();
final Class<?> loadManagerClass = Class.forName(conf.getLoadManagerClassName());
// Assume there is a constructor with one argument of PulsarService.
final Object loadManagerInstance = loadManagerClass.newInstance();
if (loadManagerInstance instanceof LoadManager) {
final LoadManager casted = (LoadManager) loadManagerInstance;
casted.initialize(pulsar);
return casted;
} else if (loadManagerInstance instanceof ModularLoadManager) {
final LoadManager casted = new ModularLoadManagerWrapper((ModularLoadManager) loadManagerInstance);
casted.initialize(pulsar);
return casted;
}
} catch (Exception e) {
LOG.warn("Error when trying to create load manager: ", e);
}
// 使用内置的负载均衡器。
// If we failed to create a load manager, default to SimpleLoadManagerImpl.
return new SimpleLoadManagerImpl(pulsar);
}

可以看到,如果我们在配置文件中提供了自定义的加载管理器,则优先使用自定义的,否则使用默认的SimpleLoadManagerImpl类。

然后我们看下LoadManager提供的API:

/**
* LoadManager runs though set of load reports collected from different brokers and generates a recommendation of
* namespace/ServiceUnit placement on machines/ResourceUnit. Each Concrete Load Manager will use different algorithms to
* generate this mapping.
*
* Concrete Load Manager is also return the least loaded broker that should own the new namespace.
*/
public interface LoadManager {
Logger LOG = LoggerFactory.getLogger(LoadManager.class);
String LOADBALANCE_BROKERS_ROOT = "/loadbalance/brokers";
void start() throws PulsarServerException;
/**
* Is centralized decision making to assign a new bundle.
*/
boolean isCentralized();
/**
* Returns the Least Loaded Resource Unit decided by some algorithm or criteria which is implementation specific.
*/
Optional<ResourceUnit> getLeastLoaded(ServiceUnitId su) throws Exception;
/**
* Generate the load report.
*/
LoadManagerReport generateLoadReport() throws Exception;
/**
* Set flag to force load report update.
*/
void setLoadReportForceUpdateFlag();
/**
* Publish the current load report on ZK.
*/
void writeLoadReportOnZookeeper() throws Exception;
/**
* Publish the current load report on ZK, forced or not.
* By default rely on method writeLoadReportOnZookeeper().
*/
default void writeLoadReportOnZookeeper(boolean force) throws Exception {
writeLoadReportOnZookeeper();
}
/**
* Update namespace bundle resource quota on ZK.
*/
void writeResourceQuotasToZooKeeper() throws Exception;
/**
* Generate load balancing stats metrics.
*/
List<Metrics> getLoadBalancingMetrics();
/**
* Unload a candidate service unit to balance the load.
*/
void doLoadShedding();
/**
* Namespace bundle split.
*/
void doNamespaceBundleSplit() throws Exception;
/**
* Removes visibility of current broker from loadbalancer list so, other brokers can't redirect any request to this
* broker and this broker won't accept new connection requests.
*
* @throws Exception
*/
void disableBroker() throws Exception;
/**
* Get list of available brokers in cluster.
*
* @return
* @throws Exception
*/
Set<String> getAvailableBrokers() throws Exception;
void stop() throws PulsarServerException;
/**
* Initialize this LoadManager.
*
* @param pulsar
* The service to initialize this with.
*/
void initialize(PulsarService pulsar);
}

可以看到,LoadManager提供了关于加载状态汇报、保存状态到zk、卸载服务以平衡加载、bundle拆分、停止broker和获取可用broker等api,方便我们对整个集群的加载进行管理和控制。

我们自己实现的加载管理器,需要采集各个broker节点的状态,然后根据topic和bundle信息,平均分配bundle到不同的broker上,确保各个broker的负载相对均衡。

3. LoadSheddingTask(加载移除)

这个定时任务就是调用加载管理器的doLoadShedding方法,如下:

@Override
public void run() {
try {
loadManager.get().doLoadShedding();
} catch (Exception e) {
LOG.warn("Error during the load shedding", e);
}
}

在SimpleLoadManagerImpl中,是通过遍历所有broker汇报的bundle状态,找到其中过载的bundle,然后卸载掉。

pulsar.getAdminClient().namespaces().unloadNamespaceBundle(
LoadManagerShared.getNamespaceNameFromBundleName(bundleName),
LoadManagerShared.getBundleRangeFromBundleName(bundleName));
);

4. LoadResourceQuotaUpdaterTask

这个定时任务就是调用资源管理器的writeResourceQuatosToZookeeper把资源使用情况写入zk,如下:

@Override
public void run() {
try {
this.loadManager.get().writeResourceQuotasToZooKeeper();
} catch (Exception e) {
LOG.warn("Error write resource quota", e);
}
}

六、待研究问题

自定义均衡管理器需要注意哪些内容。

如何管理topic和bundle的分配策略。

是否可实现一个topic分配到多个bundle上,多个bundle分配到不同的broker上,数据存储不变,这样实现通过多个broker读取一个topic的数据。

七、参考资料

https://pulsar.apache.org/docs/en/administration-load-balance/

https://pulsar.apache.org/docs/en/develop-load-manager/


读取和解析pulsar保存在bookkeeper上的消息

pulsar使用bk对消息进行持久化,为了实现只读broker,需要跨过pulsar直接连接bk读取消息。在bk中ledger是一个日志段,bk以ledger为粒度进行数据的多地备份,ledger包含多个entry,每个entry对应pulsar中的一条或者多条消息。

而pulsar每个topic在bk中的存储信息保存在zk中。即我们可以通过zk中获取特定topic的ledger信息,然后连接到bk,读取ledger下的每个entry的消息。具体代码如下:

package tmp;
import com.google.common.base.Charsets;
import io.netty.buffer.ByteBuf;
import org.apache.bookkeeper.client.BookKeeper;
import org.apache.bookkeeper.client.api.DigestType;
import org.apache.bookkeeper.client.api.LedgerEntries;
import org.apache.bookkeeper.client.api.LedgerEntry;
import org.apache.bookkeeper.client.api.ReadHandle;
import org.apache.pulsar.common.api.proto.MessageMetadata;
import org.apache.pulsar.common.protocol.Commands;
import org.slf4j.Logger;
import org.slf4j.LoggerFactory;
/**
* @function
* @date 2021/8/10 16:10
*/
public class BKMain {
private static final Logger log = LoggerFactory.getLogger(BKMain.class);
public static void main(String[] args) throws Exception {
BKMain main = new BKMain();
main.run();
}
void run() throws Exception {
load01();
}
void load01() throws Exception {
// zookeeper地址
// bk的信息保存在zk的/ledger路径
String connectionString = "x.x.x.x:2181";
BookKeeper bkClient = new BookKeeper(connectionString);
// 通过zk上/managed-ledgers/tenant_c/ns1/persistent/storeV2获取topic storeV2的ledgerId
long ledgerId = 56990;
// 设置加密方式和密码(同pulsar一样)
ReadHandle handle = bkClient.newOpenLedgerOp().withRecovery(false).withLedgerId(ledgerId)
.withDigestType(DigestType.CRC32C).withPassword("".getBytes(Charsets.UTF_8)).execute().get();
// 获取上一次被添加确认的entryId。则这个entryId之前的数据对外是可见的
long id = handle.readLastAddConfirmed();
log.info("id=" + id);
long firstEntry = 0;
long lastEntry = id;
LedgerEntries entries = handle.read(firstEntry, lastEntry);
if (entries != null) {
StringBuilder sb = new StringBuilder("\n");
for (LedgerEntry entry : entries) {
ByteBuf buf = entry.getEntryBuffer();
// 解析每一条消息(因为我们本身没有采用批量的方式发送消息,没有压缩,没有加密,而且指定的schema也是string,所以解析部分也很简单)
Commands.skipBrokerEntryMetadataIfExist(buf);
Commands.skipChecksumIfPresent(buf);
sb.setLength(0);
sb.append("ledgerId=").append(entry.getLedgerId());
sb.append(", entryId=").append(entry.getEntryId());
sb.append(", dataLen=").append(entry.getLength() + buf.readableBytes());
MessageMetadata msgMetadata = Commands.parseMessageMetadata(buf);
sb.append(", numMessages=").append(msgMetadata.getNumMessagesInBatch());
sb.append(", publishTime=").append(msgMetadata.getPublishTime());
sb.append(", sequenceId=").append(msgMetadata.getSequenceId());
// 如果有些字段不是必须的,则需要先判断是否有该字段,否则解析会报错。
sb.append(", numChunks=").append(msgMetadata.hasNumChunksFromMsg() ? msgMetadata.getNumChunksFromMsg() : 0);
sb.append(", replicateFrom=").append(msgMetadata.hasReplicatedFrom() ? msgMetadata.getReplicatedFrom() : "none");
byte[] dataBytes = new byte[buf.readableBytes()];
buf.readBytes(dataBytes);
sb.append(", data=").append(new String(dataBytes));
log.info(sb.toString());
}
entries.close();
}
handle.close();
bkClient.close();
}
}

代码执行结果:

ledgerId=56990, entryId=0, dataLen=90, numMessages=1, publishTime=1628583539500, sequenceId=0, numChunks=0, replicateFrom=none, data=value 0
ledgerId=56990, entryId=1, dataLen=138, numMessages=1, publishTime=1628583539504, sequenceId=1, numChunks=0, replicateFrom=none, data=value 1
ledgerId=56990, entryId=2, dataLen=186, numMessages=1, publishTime=1628583539504, sequenceId=2, numChunks=0, replicateFrom=none, data=value 2

pulsar消息读流程(一

大致介绍下pulsar的消息读的过程

consumer通过lookup命令查找到负责消费topic的broker地址,然后连接到该broker。broker接收到请求后,首先查找内存中有没有该订阅名称的consumer信息,如果有,则找到对应的subscription信息,然后建立和consumer的关系。之后从zk和bk中获取消息处理的ledger和对应的cursor。

然后consumer可以定时发送通知(sendFlowPermitsToBroker),broker接收到通知后就从ledger读消息返回给consumer。消息的发送是异步的,在handleFlow中处理consumer的通知,然后读取数据,读取完成后就发送给consumer。

1. consumer端的处理流程

consumer的创建代码如下:


Consumer<String> c = client.newConsumer(Schema.STRING)
.topic(topic)
.subscriptionName("subscription_001")
.receiverQueueSize(4)
.subscribe();
Message<String> msg = c.receive(5, TimeUnit.SECONDS);

在subscribe后,会创建一个consumer对象,然后调用该对象的receive方法获取消息。

ConsumerBase

@Override
public Message<T> receive(int timeout, TimeUnit unit) throws PulsarClientException {
if (conf.getReceiverQueueSize() == 0) {
throw new PulsarClientException.InvalidConfigurationException(
"Can't use receive with timeout, if the queue size is 0");
}
if (listener != null) {
throw new PulsarClientException.InvalidConfigurationException(
"Cannot use receive() when a listener has been set");
}
verifyConsumerState();
return internalReceive(timeout, unit);
}

ConsumerImpl


@Override
protected Message<T> internalReceive(int timeout, TimeUnit unit) throws PulsarClientException {
Message<T> message;
try {
// 先从缓存队列中获取,如果获取不到则直接返回。
message = incomingMessages.poll(timeout, unit);
if (message == null) {
return null;
}
// 暂时不返回消息,而是给broker发送通知,表示自己可以接收更多的消息了。
messageProcessed(message);
return beforeConsume(message);
} catch (InterruptedException e) {
State state = getState();
if (state != State.Closing && state != State.Closed) {
stats.incrementNumReceiveFailed();
throw PulsarClientException.unwrap(e);
} else {
return null;
}
}
}
@Override
protected synchronized void messageProcessed(Message<?> msg) {
ClientCnx currentCnx = cnx();
ClientCnx msgCnx = ((MessageImpl<?>) msg).getCnx();
lastDequeuedMessageId = msg.getMessageId();
if (msgCnx != currentCnx) {
// The processed message did belong to the old queue that was cleared after reconnection.
} else {
increaseAvailablePermits(currentCnx);
stats.updateNumMsgsReceived(msg);
trackMessage(msg);
}
decreaseIncomingMessageSize(msg);
}
void increaseAvailablePermits(ClientCnx currentCnx) {
increaseAvailablePermits(currentCnx, 1);
}
protected void increaseAvailablePermits(ClientCnx currentCnx, int delta) {
int available = AVAILABLE_PERMITS_UPDATER.addAndGet(this, delta);
while (available >= receiverQueueRefillThreshold && !paused) {
// 确保能发送一次通知
if (AVAILABLE_PERMITS_UPDATER.compareAndSet(this, available, 0)) {
sendFlowPermitsToBroker(currentCnx, available);
break;
} else {
available = AVAILABLE_PERMITS_UPDATER.get(this);
}
}
}
/**
* send the flow command to have the broker start pushing messages
* 发送flow通知给broker,异步获取更多消息。
*/
private void sendFlowPermitsToBroker(ClientCnx cnx, int numMessages) {
if (cnx != null && numMessages > 0) {
if (log.isDebugEnabled()) {
log.debug("[{}] [{}] Adding {} additional permits", topic, subscription, numMessages);
}
if (log.isDebugEnabled()) {
cnx.ctx().writeAndFlush(Commands.newFlow(consumerId, numMessages))
.addListener(writeFuture -> {
if (!writeFuture.isSuccess()) {
log.debug("Consumer {} failed to send {} permits to broker: {}", consumerId, numMessages,
writeFuture.cause().getMessage());
} else {
log.debug("Consumer {} sent {} permits to broker", consumerId, numMessages);
}
});
} else {
cnx.ctx().writeAndFlush(Commands.newFlow(consumerId, numMessages), cnx.ctx().voidPromise());
}
}
}

2. broker端的处理流程

和consumer交互的主要是ServerCnx中的handleConnect、handleSubscribe、handleFlow、handleAck四个方法,connect中处理认证信息,subscribe中获取订阅名称,保存订阅关系,flow中接收消息接收通知,触发从ledger中读取消息,ack中处理消息消费确认信息。

在broker中,每一个topic对应一个处理实例(PersistentTopic或者NonPersistentTopic),这个实例中保存topic信息和相关订阅信息(subscriptions)。

subscription本身是一个map变量,以SubscriptionName作为key,保存详细的订阅信息(即每一个订阅名称的所有客户端共享一组订阅信息,用于处理消息订阅的四种类型)。

在Subscription中有一个dispatcher变量,该变量直接存储所有的consumer信息。

所以,上述信息的存储关系链是:

topic -> subscription -> dispatcher -> consumer

2.1 zookeeper中存储的信息

消息订阅信息保存在zookeeper中的/managed_ledgers路径下,其中有两个重要的信息:ledger信息和cursor信息。

ledger存储topic消息在bk中的信息,cursor存储消费者读取进度,在zk中的路径分别是:

/managed_ledgers/{tenant}/{namespace}/persistent/{topic}
/managed_ledgers/{tenant}/{namespace}/persistent/{topic}/{subscription_name}

在zk中的这部分信息可以直接解析出来,测试代码如下:

public void testZKMetaData() throws Exception {
String path = "/managed-ledgers/tenant_c/ns1/persistent/topic_name";
byte[] bytes = getValue(path);
if (bytes == null) {
System.out.println("bytes is null");
return;
}
MLDataFormats.ManagedLedgerInfo info = MLDataFormats.ManagedLedgerInfo.parseFrom(bytes);
StringBuilder sb = new StringBuilder();
for (MLDataFormats.ManagedLedgerInfo.LedgerInfo ls : info.getLedgerInfoList()) {
sb.setLength(0);
sb.append("ledgerId=").append(ls.getLedgerId());
sb.append(", entries=").append(ls.getEntries());
sb.append(", size=").append(ls.getSize());
sb.append(", timestamp=").append(ls.getTimestamp());
System.out.println("debug vv " + sb);
}
System.out.println("done");
}
public void testZKMetaDataCursorInfo() throws Exception {
String path = "/managed-ledgers/tenant_c/ns1/persistent/topic_name/subscription_name_0";
path = "/managed-ledgers/tenant_c/ns1/persistent/topic_name/subscription_name_1";
byte[] bytes = getValue(path);
if (bytes == null) {
System.out.println("bytes is null");
return;
}
MLDataFormats.ManagedCursorInfo info = MLDataFormats.ManagedCursorInfo.parseFrom(bytes);
StringBuilder sb = new StringBuilder();
sb.setLength(0);
sb.append("markDeleteLedgerId=").append(info.getMarkDeleteLedgerId());
sb.append(", markDeleteEntryId=").append(info.getMarkDeleteEntryId());
sb.append(", lastActive=").append(info.getLastActive());
System.out.println("debug vv " + sb);
System.out.println("done");
}
byte[] getValue(String path) throws Exception {
CountDownLatch latch = new CountDownLatch(1);
ZooKeeper zoo = new ZooKeeper("x.x.x.x:2181", 10000, new Watcher() {
@Override
public void process(WatchedEvent event) {
if (event.getState() == Event.KeeperState.SyncConnected) {
latch.countDown();
}
System.out.println("state " + event.getState());
}
});
latch.await();
byte[] bytes = zoo.getData(path, null, null);
zoo.close();
return bytes;
}

testZKMetaData输出结果为:

debug vv ledgerId=56929, entries=10, size=710, timestamp=1628234384802
debug vv ledgerId=56933, entries=10, size=720, timestamp=1628235295486
debug vv ledgerId=56937, entries=10, size=710, timestamp=1628240968389
debug vv markDeleteLedgerId=56933, markDeleteEntryId=9, lastActive=1628236717415
debug vv markDeleteLedgerId=56937, markDeleteEntryId=2, lastActive=1628240766897

2.2 ManagedLedgerInfo和ManagedCursorInfo结构

/**
* Licensed to the Apache Software Foundation (ASF) under one
* or more contributor license agreements. See the NOTICE file
* distributed with this work for additional information
* regarding copyright ownership. The ASF licenses this file
* to you under the Apache License, Version 2.0 (the
* "License"); you may not use this file except in compliance
* with the License. You may obtain a copy of the License at
*
* http://www.apache.org/licenses/LICENSE-2.0
*
* Unless required by applicable law or agreed to in writing,
* software distributed under the License is distributed on an
* "AS IS" BASIS, WITHOUT WARRANTIES OR CONDITIONS OF ANY
* KIND, either express or implied. See the License for the
* specific language governing permissions and limitations
* under the License.
*/
syntax = "proto2";
option java_package = "org.apache.bookkeeper.mledger.proto";
option optimize_for = SPEED;
message KeyValue {
required string key = 1;
required string value = 2;
}
message OffloadDriverMetadata {
required string name = 1;
repeated KeyValue properties = 2;
}
message OffloadContext {
optional int64 uidMsb = 1;
optional int64 uidLsb = 2;
optional bool complete = 3;
optional bool bookkeeperDeleted = 4;
optional int64 timestamp = 5;
optional OffloadDriverMetadata driverMetadata = 6;
repeated OffloadSegment offloadSegment = 7;
}
message OffloadSegment {
optional int64 uidMsb = 1;
optional int64 uidLsb = 2;
optional bool complete = 3;
optional int64 assignedTimestamp = 4; //timestamp in millisecond
optional int64 offloadedTimestamp = 5; //timestamp in millisecond
optional int64 endEntryId = 6;
optional OffloadDriverMetadata driverMetadata = 7;
}
message ManagedLedgerInfo {
message LedgerInfo {
required int64 ledgerId = 1;
optional int64 entries = 2;
optional int64 size = 3;
optional int64 timestamp = 4;
optional OffloadContext offloadContext = 5;
}
repeated LedgerInfo ledgerInfo = 1;
// If present, it signals the managed ledger has been
// terminated and this was the position of the last
// committed entry.
// No more entries can be written.
optional NestedPositionInfo terminatedPosition = 2;
repeated KeyValue properties = 3;
}
message PositionInfo {
required int64 ledgerId = 1;
required int64 entryId = 2;
repeated MessageRange individualDeletedMessages = 3;
// Additional custom properties associated with
// the current cursor position
repeated LongProperty properties = 4;
// Store which index in the batch message has been deleted
repeated BatchedEntryDeletionIndexInfo batchedEntryDeletionIndexInfo = 5;
}
message NestedPositionInfo {
required int64 ledgerId = 1;
required int64 entryId = 2;
}
message MessageRange {
required NestedPositionInfo lowerEndpoint = 1;
required NestedPositionInfo upperEndpoint = 2;
}
message BatchedEntryDeletionIndexInfo {
required NestedPositionInfo position = 1;
repeated int64 deleteSet = 2;
}
// Generic string and long tuple
message LongProperty {
required string name = 1;
required int64 value = 2;
}
message ManagedCursorInfo {
// If the ledger id is -1, then the mark-delete position is
// the one from the (ledgerId, entryId) snapshot below
required int64 cursorsLedgerId = 1;
// Last snapshot of the mark-delete position
optional int64 markDeleteLedgerId = 2;
optional int64 markDeleteEntryId = 3;
repeated MessageRange individualDeletedMessages = 4;
// Additional custom properties associated with
// the current cursor position
repeated LongProperty properties = 5;
optional int64 lastActive = 6;
// Store which index in the batch message has been deleted
repeated BatchedEntryDeletionIndexInfo batchedEntryDeletionIndexInfo = 7;
}

2.3 判断topic是属于哪一个broker

通过topic查找bundle,然后判断bundle是否属于broker。

OwnershipCache中的ownershipReadOnlyCache:


private CompletableFuture<Optional<Map.Entry<NamespaceEphemeralData, Stat>>> resolveOwnership(String path) {
// 通过缓存的zk信息,找到该path(topic全路径)对应的的bundle信息
return ownershipReadOnlyCache.getWithStatAsync(path).thenApply(optionalOwnerDataWithStat -> {
if (optionalOwnerDataWithStat.isPresent()) {
Map.Entry<NamespaceEphemeralData, Stat> ownerDataWithStat = optionalOwnerDataWithStat.get();
Stat stat = ownerDataWithStat.getValue();
if (stat.getEphemeralOwner() == localZkCache.getZooKeeper().getSessionId()) {
LOG.info("Successfully reestablish ownership of {}", path);
OwnedBundle ownedBundle = new OwnedBundle(ServiceUnitUtils.suBundleFromPath(path, bundleFactory));
if (selfOwnerInfo.getNativeUrl().equals(ownerDataWithStat.getKey().getNativeUrl())) {
ownedBundlesCache.put(path, CompletableFuture.completedFuture(ownedBundle));
}
ownershipReadOnlyCache.invalidate(path);
}
}
return optionalOwnerDataWithStat;
});
}

3. 总结

  • consumer可以随机连上一个broker,通过发送lookup命令可以最终找到一个处理所需topic的broker地址,然后连接到该broker。
  • broker接收到consumer连接后,建立好topic - subscription - dispatcher - consumer的关系,同时打开ledger和cursor,准备消息的读写。
  • consumer建立好连接后,不定时的发送flow命令,通知broker可以发送更多的消息了,broker接收到命令后,通过ledger读取消息并异步发送给consumer。

pulsar对消息进行加密

pular支持对消息的传输过程进行加密,加密方式有两种:一种是直接使用TLS,一种是基于加密算法进行数据加密。

本文主要是记录下基于加密算法进行加密的方法。

1. 加解密的流程

pulsar使用AES对数据进行加密,AES的密钥和消息一起转发,并且AES密钥使用ECDSA/RSA进行加密。

如果使用pulsar的加密功能,需要先生成一对密钥:公钥、私钥。生产者使用公钥对AES密钥进行加密,消费者使用私钥对AES密钥进行解密。

由于pulsar本身是不存储密钥的,所以如果生产者和消费者丢失了密钥,则数据就永远不能解密了。

下面分别是生产者加密流程和消费者解密流程:

图片

图片

2. 具体实现方式

2.1 使用openssl生成密钥对

openssl ecparam -name secp521r1 -genkey -param_enc explicit -out test_ecdsa_privkey.pem
openssl ec -in test_ecdsa_privkey.pem -pubout -outform pkcs8 -out test_ecdsa_pubkey.pem

2.2 实现CryptoKeyReader接口,用于pulsar获取密钥

package encrypt;
import org.apache.pulsar.client.api.CryptoKeyReader;
import org.apache.pulsar.client.api.EncryptionKeyInfo;
import java.io.File;
import java.nio.file.Files;
import java.util.Map;
/**
* @function
* @date 2021/7/27 9:45
*/
public class RawFileKeyReader implements CryptoKeyReader {
String publicKeyFile = "F:\\download\\test_ecdsa_pubkey.pem";
String privateKeyFile = "F:\\download\\test_ecdsa_privkey.pem";
@Override
public EncryptionKeyInfo getPublicKey(String keyName, Map<String, String> metadata) {
EncryptionKeyInfo info = new EncryptionKeyInfo();
try {
System.out.println("getPublicKey");
info.setKey(Files.readAllBytes(new File(publicKeyFile).toPath()));
} catch (Exception e) {
e.printStackTrace();
}
return info;
}
@Override
public EncryptionKeyInfo getPrivateKey(String keyName, Map<String, String> metadata) {
EncryptionKeyInfo info = new EncryptionKeyInfo();
System.out.println("getPrivateKey");
try {
info.setKey(Files.readAllBytes(new File(privateKeyFile).toPath()));
} catch (Exception e) {
e.printStackTrace();
}
return info;
}
}

2.3 编写生产者和消费者进行测试

package encrypt;
import auth.client.VVAuthentication;
import org.apache.pulsar.client.api.*;
import org.slf4j.Logger;
import org.slf4j.LoggerFactory;
import java.util.concurrent.TimeUnit;
/**

* @function
* @date 2021/7/27 8:47
*/
public class EncryptTest {
private static final Logger log = LoggerFactory.getLogger(EncryptTest.class);
public static void main(String[] args) throws Exception {
EncryptTest main = new EncryptTest();
main.run();
}
String topic = "persistent://tenant_c/ns1/topic1";
void run() throws Exception {
PulsarClient client = PulsarClient.builder()
.authentication(new VVAuthentication())
.serviceUrl("pulsar://172.20.140.11:6650")
.build();
produce(client);
consume(client);
client.close();
}
void produce(PulsarClient client) throws Exception {
Producer p = client.newProducer()
.topic(topic)
.producerName("pro_encrypt")
// 设置AES密钥,如果不设置则不会对消息加密
.addEncryptionKey("vv_01")
// 设置从哪获取公钥/私钥
.cryptoKeyReader(new RawFileKeyReader())
.create();
MessageId id = p.newMessage(Schema.STRING).key("key-1").value("hello world").send();
p.flush();
log.info("send " + id);
p.close();
}
void consume(PulsarClient client) throws Exception {
Consumer c = client.newConsumer()
.subscriptionName("con_encrypt")
.topic(topic)
.cryptoKeyReader(new RawFileKeyReader())
.subscribe();
while (true) {
Message msg = c.receive(2, TimeUnit.SECONDS);
if (msg == null) {
break;
}
c.acknowledge(msg);
log.info("receive " + msg.getKey() + ", " + new String(msg.getData()));
}
c.close();
}
}

输出结果如下:

getPublicKey
12:29:21.462 [main] INFO encrypt.EncryptTest - send 56925:3:-1
getPrivateKey
12:29:21.535 [main] INFO encrypt.EncryptTest - receive key-1, hello world

可以看到在生产者端使用公钥对AES密钥加密,在消费者端使用私钥对AES密钥进行解密。

生产者设置数据加密密钥:

/**
* Add public encryption key, used by producer to encrypt the data key.
*
* <p>At the time of producer creation, Pulsar client checks if there are keys added to encryptionKeys. If keys are
* found, a callback {@link CryptoKeyReader#getPrivateKey(String, Map)} and
* {@link CryptoKeyReader#getPublicKey(String, Map)} is invoked against each key to load the values of the key.
* Application should implement this callback to return the key in pkcs8 format. If compression is enabled, message
* is encrypted after compression. If batch messaging is enabled, the batched message is encrypted.
*
* @param key
* the name of the encryption key in the key store
* @return the producer builder instance
*/
ProducerBuilder<T> addEncryptionKey(String key);

当生产者创建时,pulsar客户端检查是否添加了密钥,如果找到了就回调CryptoKeyReader的方法获取公钥/私钥。应用需要实现CryptoKeyReader的方法,并返回pkcs8格式的密钥。如果消息开启了压缩,则消息会在压缩后被加密。如果消息是批量发送的,则消息被打包后会被加密。


认证和授权(3)

1. 认证和授权流程

认证和授权需要一个第三方用户管理中心,该管理中心的功能包含以下几点:

  1. 提供用户注册和管理。
  2. 提供tenant、namespace、topic的创建和管理。
  3. 提供用户信息和权限的验证接口。

当新增一个业务时,需要创建对应的用户,然后使用该用户创建tenant、namespace和topic。然后客户端可以携带用户名/密码连接到broker,broker到管理中心验证用户是否有效,拉取用户的权限并保存到本地,之后对客户端的操作进行权限的验证。

整体流程:

图片

上述设计的核心是把tenant、namespace、topic的看作一种资源,消息的发布和订阅看作是对资源的使用,认证和授权的方案设计就可以分成两部分:

  1. 对资源的管理权限
  2. 对资源的使用权限

其中,对资源的管理权限可以由用户中心去做,可以创建用户,给用户分配资源和使用权限,同时也可以给用户创建子用户,给子用户分配主用户权限下的资源等。用户中心的输出就是<角色,权限>的集合,把这个集合提供给broker,这样broker就可以根据这个集合判断用户的操作是否合法。

2. 数据表设计

表名 含义 功能 备注
sys_user_info 用户信息表 配置用户信息
sys_service_group 业务分组表 用户属于某一个业务
sys_role 角色表 用角色进行权限的控制
sys_user_role_map 用户和角色关系表 用户和角色之间的关系,一个用户可能属于多个角色
res_cluster 集群表 配置ADMQ集群信息,包含名称、地址等
res_tenant 租户表 配置集群下的租户信息
res_namespace 命名空间表 配置租户下的namespace信息
res_topic topic表 配置namespace下的topic信息
sys_role_res 角色和资源权限关系表 配置角色和资源之间的关系和对应的权限
sys_authority 权限配置表 配置资源权限字典

2.1 用户信息表

名称 含义 类型 备注
id 用户ID bigint(20) 主键递增
username 用户名称 varchar(128)
nick 昵称 varchar(128)
passwd 用户密码 varchar(128) 加密后
service_group 业务分组 bigint(20)
add_time 添加时间 bigint(20)
update_time 修改时间 bigint(20)
remark 备注信息 varchar(256)

2.2 业务分组表

名称 含义 类型 备注
id 组ID bigint(20) 主键递增
group_name 分组名称 varchar(128)
add_time 添加时间 bigint(20)
update_time 修改时间 bigint(20)
remark 备注信息 varchar(256)

2.3 角色表

名称 含义 类型 备注
id 组ID bigint(20) 主键递增
role_name 角色名称 varchar(128)
add_time 添加时间 bigint(20)
update_time 修改时间 bigint(20)
remark 备注信息 varchar(256)

2.4 用户和角色关系表

名称 含义 类型 备注
user_id 用户id bigint(20)
role_id 角色id bigint(20)
add_time 添加时间 bigint(20)
remark 备注信息 varchar(256)

1.5 集群表

名称 含义 类型 备注
id 组ID bigint(20) 主键递增
name 集群名称 varchar(128)
address 集群地址 varchar(128)
add_time 添加时间 bigint(20)
update_time 修改时间 bigint(20)
remark 备注信息 varchar(256)

1.6 租户表

名称 含义 类型 备注
id 组ID bigint(20) 主键递增
clusters 所属集群 varchar(128) 可以属于多个集群
name 名称 varchar(128)
is_valid 是否有效 int(2) 1:有效,2:无效
add_time 添加时间 bigint(20)
update_time 修改时间 bigint(20)
remark 备注信息 varchar(256)

1.7 命名空间表

名称 含义 类型 备注
id 组ID bigint(20) 主键递增
tenant 租户ID bigint(20)
name 名称 varchar(128)
is_valid 是否有效 int(2) 1:有效,2:无效
add_time 添加时间 bigint(20)
update_time 修改时间 bigint(20)
remark 备注信息 varchar(256)

1.8 topic表

名称 含义 类型 备注
id 组ID bigint(20) 主键递增
tenant 租户ID bigint(20)
namespace 命名空间ID bigint(20)
name 名称 varchar(128)
is_valid 是否有效 int(2) 1:有效,2:无效
add_time 添加时间 bigint(20)
update_time 修改时间 bigint(20)
remark 备注信息 varchar(256)

1.9 角色和资源权限关系表

名称 含义 类型 备注
role_id 角色ID bigint(20)
res_type 资源类型 int(11) 1:cluster2:tenant3:namespace4:topic
res_id 资源ID bigint(20)
authorities 权限列表 varchar(128) 逗号隔开
add_time 添加时间 bigint(20)
remark 备注信息 varchar(256)

1.10 权限配置表

名称 含义 类型 备注
id 主键 int(11)
desc 权限描述 varchar(256)
add_time 添加时间 bigint(20)
remark 备注信息 varchar(256)

目前支持的几种权限:

ID 含义 备注
100 创建tenant
101 删除tenant
102 tenant下所有topic的写权限
103 tenant下所有topic的读权限
200 创建namespace
201 删除namespace
202 namespace下所有topic的写权限
203 namespace下所有topic的读权限
300 创建topic
301 删除topic
302 topic的写权限
303 topic的读权限

pulsar失败重试(negativeAckRedeliveryDelay)的解释

在pulsar讨论群里看到关于这个api的问题,然后就去看了代码,了解了其功能和详细处理逻辑,在此记录下。

1. 消息发布订阅流程

image-20231008221757348

如上图所示,消费者收到消息并返回确认后,broker端就认为这条消息被成功转发了。但是consumer端接收到消息后可能会处理失败,导致没有发送确认给broker。broker端有一个未确认消息队列,这个队列达到一定大小后就会阻塞,这时broker就不会继续发送消息给consumer,也不会重复发送以前未确认的消息给consumer。如果consumer和broker断开连接了,未确认的消息就又会重新发送给consumer了。

这时候有人看到negativeAckRedeliveryDelay,猜想是不是可以设置重复消费消息,即当一定时间内没有确认后能再次接收到该消息。然后我看过代码后发现确实是能实现的,实现方式是handler回复消费失败后,把失败的消息发送给broker,broker再发送给consumer。

2. 关于消息重复发送的解释

image-20231008221819464

broker发送Msg01给consumer1,consumer1在handle中处理失败,调用negativeAcknowledge方法,发送处理失败的消息信息给broker,broker收到后再选择发送给consumer1或者consumer2.

其中两个重要的API:

ConsumerBuilder,用于设置多长时间后再次收到处理失败的消息。

ConsumerBuilder<T> ackTimeoutTickTime(long tickTime, TimeUnit timeUnit);
/**
* Set the delay to wait before re-delivering messages that have failed to be process.
*
* <p>When application uses {@link Consumer#negativeAcknowledge(Message)}, the failed message
* will be redelivered after a fixed timeout. The default is 1 min.
*
* @param redeliveryDelay
* redelivery delay for failed messages
* @param timeUnit
* unit in which the timeout is provided.
* @return the consumer builder instance
* @see Consumer#negativeAcknowledge(Message)
*/
ConsumerBuilder<T> negativeAckRedeliveryDelay(long redeliveryDelay, TimeUnit timeUnit);

Consumer,用于通知broker自己处理消息失败了。

/**
* Acknowledge the failure to process a single message.
*
* <p>When a message is "negatively acked" it will be marked for redelivery after
* some fixed delay. The delay is configurable when constructing the consumer
* with {@link ConsumerBuilder#negativeAckRedeliveryDelay(long, TimeUnit)}.
*
* <p>This call is not blocking.
*
* <p>Example of usage:
* <pre><code>
* while (true) {
* Message&lt;String&gt; msg = consumer.receive();
*
* try {
* // Process message...
*
* consumer.acknowledge(msg);
* } catch (Throwable t) {
* log.warn("Failed to process message");
* consumer.negativeAcknowledge(msg);
* }
* }
* </code></pre>
*
* @param message
* The {@code Message} to be acknowledged
*/
void negativeAcknowledge(Message<?> message);

3. 测试

测试的思路是:

  1. 编写两个客户端,同时订阅一份数据。
  2. 在第一个客户端里返回无效确认,第二个客户端里返回有效确认。
  3. 确认第一个客户端返回取消确认的消息是否能被第二个客户端收到。

测试代码:

package ack;
import auth.client.VVAuthentication;
import org.apache.pulsar.client.api.*;
import org.slf4j.Logger;
import org.slf4j.LoggerFactory;
import java.util.concurrent.CountDownLatch;
import java.util.concurrent.TimeUnit;
/**
* @function
* @date 2021/8/4 16:23
*/
public class RedeliverTest {
private static final Logger log = LoggerFactory.getLogger(RedeliverTest.class);
public static void main(String[] args) throws Exception {
RedeliverTest main = new RedeliverTest();
main.run();
}
String topic = "persistent://tenant_vv/ns1/redeliver_test";
void run() throws Exception {
CountDownLatch latch = new CountDownLatch(1);
new Thread(() -> consumer(true, latch)).start();

// 确保第一个消费者先收到消息
latch.await();
new Thread(() -> consumer(false, latch)).start();
produce();
log.info("done");
}
void produce() throws Exception {
try (PulsarClient client = newClient()) {
Producer p = client.newProducer()
.topic(topic)
.create();
for (int i=0; i<2; i++) {
p.newMessage(Schema.STRING).value("data_" + i).key("sub mode "+ i).sendAsync();
}
p.flush();
p.close();
} catch (Exception e) {
log.error("", e);
}
}
void consumer(boolean replay, CountDownLatch latch) {
try (PulsarClient client = newClient()) {
String tag = "replay_mode_" + replay;
Consumer c = client.newConsumer(Schema.STRING)
.topic(topic)
// 设置消息处理失败后,2秒后再此收到消息。
.negativeAckRedeliveryDelay(2, TimeUnit.SECONDS)
.subscriptionType(SubscriptionType.Shared)
.subscriptionName("sub_name")
.subscribe();
latch.countDown();
while (true) {
Message<String> msg = c.receive(10, TimeUnit.SECONDS);
if (msg == null) {
break;
}
if (replay) {
c.negativeAcknowledge(msg);
} else {
c.acknowledge(msg);
}
log.info(tag + " receive " + msg.getValue());
}
c.close();
} catch (Exception e) {
log.error("", e);
}
}
PulsarClient newClient() throws Exception {
PulsarClient client = PulsarClient.builder()
.serviceUrl("pulsar://x.x.x.x:6650")
.authentication(new VVAuthentication())
.build();
return client;
}
}

测试结果:

16:52:56.639 [Thread-1] INFO  ack.RedeliverTest - replay_mode_true receive data_0
16:52:56.639 [Thread-1] INFO ack.RedeliverTest - replay_mode_true receive data_1
16:52:58.660 [Thread-3] INFO ack.RedeliverTest - replay_mode_false receive data_0
16:52:58.660 [Thread-3] INFO ack.RedeliverTest - replay_mode_false receive data_1

可以看到,第一个客户端收到消息并调用negativeAcknowledge返回无效确认后,第二个客户端在2秒后能收到消息了,并且消息是有序的。

4. 涉及到的主要代码

主要逻辑是,consumer处理失败后,把失败的消息通知给broker,broker把失败消息缓存起来,标记为需要重新发送的消息,然后每次发送消息给消费者的时候检查是否有需要重发的消息,如果有的话就发送。

4.1 ConsumerImpl

保存消息并等待发送

@Override
public void negativeAcknowledge(MessageId messageId) {
negativeAcksTracker.add(messageId);
// Ensure the message is not redelivered for ack-timeout, since we did receive an "ack"
unAckedMessageTracker.remove(messageId);
}

使用接收消息的netty channel发送失败消息通知给broker

@Override
public void redeliverUnacknowledgedMessages(Set<MessageId> messageIds) {
if (messageIds.isEmpty()) {
return;
}
checkArgument(messageIds.stream().findFirst().get() instanceof MessageIdImpl);
if (conf.getSubscriptionType() != SubscriptionType.Shared
&& conf.getSubscriptionType() != SubscriptionType.Key_Shared) {
// We cannot redeliver single messages if subscription type is not Shared
redeliverUnacknowledgedMessages();
return;
}
ClientCnx cnx = cnx();
if (isConnected() && cnx.getRemoteEndpointProtocolVersion() >= ProtocolVersion.v2.getValue()) {
int messagesFromQueue = removeExpiredMessagesFromQueue(messageIds);
Iterable<List<MessageIdImpl>> batches = Iterables.partition(
messageIds.stream()
.map(messageId -> (MessageIdImpl)messageId)
.collect(Collectors.toSet()), MAX_REDELIVER_UNACKNOWLEDGED);
batches.forEach(ids -> {
getRedeliveryMessageIdData(ids).thenAccept(messageIdData -> {
if (!messageIdData.isEmpty()) {
ByteBuf cmd = Commands.newRedeliverUnacknowledgedMessages(consumerId, messageIdData);
cnx.ctx().writeAndFlush(cmd, cnx.ctx().voidPromise());
}
});
});
if (messagesFromQueue > 0) {
increaseAvailablePermits(cnx, messagesFromQueue);
}
if (log.isDebugEnabled()) {
log.debug("[{}] [{}] [{}] Redeliver unacked messages and increase {} permits", subscription, topic,
consumerName, messagesFromQueue);
}
return;
}
if (cnx == null || (getState() == State.Connecting)) {
log.warn("[{}] Client Connection needs to be established for redelivery of unacknowledged messages", this);
} else {
log.warn("[{}] Reconnecting the client to redeliver the messages.", this);
cnx.ctx().close();
}
}

4.2 NegativeAcksTraker

添加处理失败的消息到缓存中

public synchronized void add(MessageId messageId) {
if (messageId instanceof BatchMessageIdImpl) {
BatchMessageIdImpl batchMessageId = (BatchMessageIdImpl) messageId;
messageId = new MessageIdImpl(batchMessageId.getLedgerId(), batchMessageId.getEntryId(),
batchMessageId.getPartitionIndex());
}
if (nackedMessages == null) {
nackedMessages = new HashMap<>();
}
nackedMessages.put(messageId, System.nanoTime() + nackDelayNanos);
if (this.timeout == null) {
// Schedule a task and group all the redeliveries for same period. Leave a small buffer to allow for
// nack immediately following the current one will be batched into the same redeliver request.
this.timeout = timer.newTimeout(this::triggerRedelivery, timerIntervalNanos, TimeUnit.NANOSECONDS);
}
}

通过触发器发送失败消息到broker


private synchronized void triggerRedelivery(Timeout t) {
if (nackedMessages.isEmpty()) {
this.timeout = null;
return;
}
// Group all the nacked messages into one single re-delivery request
Set<MessageId> messagesToRedeliver = new HashSet<>();
long now = System.nanoTime();
nackedMessages.forEach((msgId, timestamp) -> {
if (timestamp < now) {
addChunkedMessageIdsAndRemoveFromSequnceMap(msgId, messagesToRedeliver, this.consumer);
messagesToRedeliver.add(msgId);
}
});
messagesToRedeliver.forEach(nackedMessages::remove);
consumer.onNegativeAcksSend(messagesToRedeliver);
// 使用netty发送消息给broker
consumer.redeliverUnacknowledgedMessages(messagesToRedeliver);
this.timeout = timer.newTimeout(this::triggerRedelivery, timerIntervalNanos, TimeUnit.NANOSECONDS);
}

4.3 ServerCnx

处理接收到的需要重新发送的消息

@Override
protected void handleRedeliverUnacknowledged(CommandRedeliverUnacknowledgedMessages redeliver) {
checkArgument(state == State.Connected);
if (log.isDebugEnabled()) {
log.debug("[{}] Received Resend Command from consumer {} ", remoteAddress, redeliver.getConsumerId());
}
CompletableFuture<Consumer> consumerFuture = consumers.get(redeliver.getConsumerId());
if (consumerFuture != null && consumerFuture.isDone() && !consumerFuture.isCompletedExceptionally()) {
Consumer consumer = consumerFuture.getNow(null);
if (redeliver.getMessageIdsCount() > 0 && Subscription.isIndividualAckMode(consumer.subType())) {
consumer.redeliverUnacknowledgedMessages(redeliver.getMessageIdsList());
} else {
consumer.redeliverUnacknowledgedMessages();
}
}
}

4.4 Consumer

public void redeliverUnacknowledgedMessages(List<MessageIdData> messageIds) {
int totalRedeliveryMessages = 0;
List<PositionImpl> pendingPositions = Lists.newArrayList();
for (MessageIdData msg : messageIds) {
PositionImpl position = PositionImpl.get(msg.getLedgerId(), msg.getEntryId());
LongPair batchSize = pendingAcks.get(position.getLedgerId(), position.getEntryId());
if (batchSize != null) {
pendingAcks.remove(position.getLedgerId(), position.getEntryId());
totalRedeliveryMessages += batchSize.first;
pendingPositions.add(position);
}
}
addAndGetUnAckedMsgs(this, -totalRedeliveryMessages);
blockedConsumerOnUnackedMsgs = false;
if (log.isDebugEnabled()) {
log.debug("[{}-{}] consumer {} received {} msg-redelivery {}", topicName, subscription, consumerId,
totalRedeliveryMessages, pendingPositions.size());
}
subscription.redeliverUnacknowledgedMessages(this, pendingPositions);
msgRedeliver.recordMultipleEvents(totalRedeliveryMessages, totalRedeliveryMessages);
int numberOfBlockedPermits = PERMITS_RECEIVED_WHILE_CONSUMER_BLOCKED_UPDATER.getAndSet(this, 0);
// if permitsReceivedWhileConsumerBlocked has been accumulated then pass it to Dispatcher to flow messages
if (numberOfBlockedPermits > 0) {
MESSAGE_PERMITS_UPDATER.getAndAdd(this, numberOfBlockedPermits);
if (log.isDebugEnabled()) {
log.debug("[{}-{}] Added {} blockedPermits to broker.service.Consumer's messagePermits for consumer {}",
topicName, subscription, numberOfBlockedPermits, consumerId);
}
subscription.consumerFlow(this, numberOfBlockedPermits);
}
}

4.5 PersistentDispatcherMultipleConsumers

保存消息到缓存中

@Override
public synchronized void redeliverUnacknowledgedMessages(Consumer consumer, List<PositionImpl> positions) {
positions.forEach(position -> {
if (addMessageToReplay(position.getLedgerId(), position.getEntryId())) {
redeliveryTracker.addIfAbsent(position);
}
});
if (log.isDebugEnabled()) {
log.debug("[{}-{}] Redelivering unacknowledged messages for consumer {}", name, consumer, positions);
}
readMoreEntries();
}

5. 总结

这里只是总结下消息重发的处理逻辑,具体broker和consumer之间是怎么通信的还需要继续研究…


函数式编程 - 异步处理(CompletableFuture)

一、示例

package main;

import org.slf4j.Logger;
import org.slf4j.LoggerFactory;

import java.util.concurrent.CompletableFuture;
import java.util.concurrent.LinkedBlockingQueue;

/**
* @function
* @date 2021/8/2 17:18
*/
public class FunctionTest {
private static final Logger log = LoggerFactory.getLogger(FunctionTest.class);

public static void main(String[] args) throws Exception {
FunctionTest main = new FunctionTest();
System.out.println("\n------------------------------------ 函数式编程方式 ------------------------------------");
main.run();
System.out.println("\n------------------------------------ 经典的异步实现方式 ------------------------------------");
main.runOld();
}

long value = 101;

void run() throws Exception {
// 定义任务内容
CompletableFuture<String> future = CompletableFuture.supplyAsync(() -> {
value += 101;
log.info("supplyAsync, value=" + value);
return String.format("%d", value);
});

Thread.sleep(1000);
log.info("sleep done");

// 执行完任务后执行匿名函数
CompletableFuture<Void> next = future.thenAccept(v -> {
log.info("thenAccept, value=" + v);
});

// 获取任务的执行结果
String result = future.get();
log.info("thenAccept, get=" + result);
}

void runOld() throws Exception {
value = 101;
LinkedBlockingQueue<String> queue = new LinkedBlockingQueue<>();
// 启动线程执行任务
task(queue);

// 阻塞方式等待任务执行结束
String result = queue.take();
log.info("thenAccept, get=" + result);
}

void task(LinkedBlockingQueue<String> queue) {
new Thread(() -> {
String result = "failed";
try {
value += 101;
log.info("supplyAsync, value=" + value);
result = String.format("%d", value);
} catch (Exception e) {
log.error("", e);
}

try {
queue.put(result);
} catch (InterruptedException e) {
log.error("", e);
}
}).start();
}
}

二、输出

------------------------------------   函数式编程方式  ------------------------------------
08:47:51.571 [ForkJoinPool.commonPool-worker-1] INFO main.FunctionTest - supplyAsync, value=202
08:47:52.575 [main] INFO main.FunctionTest - sleep done
08:47:52.575 [main] INFO main.FunctionTest - thenAccept, value=202
08:47:52.575 [main] INFO main.FunctionTest - thenAccept, get=202

------------------------------------ 经典的异步实现方式 ------------------------------------
08:47:52.576 [Thread-1] INFO main.FunctionTest - supplyAsync, value=202
08:47:52.576 [main] INFO main.FunctionTest - thenAccept, get=202

Process finished with exit code 0

三、解释

解决的是执行完一个异步函数后,得到执行结果或者根据执行结果继续执行后续的处理逻辑。

之前的方法是把异步执行的任务放到线程中执行,然后另外一个线程监听通知队列或者阻塞等待任务执行完毕,任务执行完后往队列放一个通知,通知等待线程。

现在可以采用更为简洁的方式去处理这种场景:

  1. 定义一个异步函数
  2. 使异步函数执行
  3. 获取执行结果

当调用get、thenAccept等方法后,java本身会帮助我们执行异步逻辑,并以阻塞的方式等待结果。

一个函数对象只会执行一次,执行完之后会保存这个结果,下次调用get等计算方法的时候直接使用上次的计算结果。

四、查看代码

通过get方法查看具体的执行方式:

CompletableFuture.get()

public T get() throws InterruptedException, ExecutionException {
Object r;
return reportGet((r = result) == null ? waitingGet(true) : r);
}

如果函数之前执行过,则会把结果保存到result变量中,调用get方法执行返回result结果;

如果函数没有执行过,则调用waitingGet方法执行。

下面看waitingGet方法:

private Object waitingGet(boolean interruptible) {
Signaller q = null;
boolean queued = false;
int spins = -1;
Object r;
while ((r = result) == null) {
if (spins < 0) spins = SPINS;
else if (spins > 0) {
if (ThreadLocalRandom.nextSecondarySeed() >= 0) --spins;
} else if (q == null) q = new Signaller(interruptible, 0L, 0L);
else if (!queued) queued = tryPushStack(q);
else if (interruptible && q.interruptControl < 0) {
q.thread = null;
cleanStack();
return null;
} else if (q.thread != null && result == null) {
try {
ForkJoinPool.managedBlock(q);
} catch (InterruptedException ie) {
q.interruptControl = -1;
}
}
}
if (q != null) {
q.thread = null;
if (q.interruptControl < 0) {
if (interruptible)
r = null;
// report interruption
else Thread.currentThread().interrupt();
}
}
postComplete();
return r;
}

此方法的目的是阻塞的方式检测定义的function是否执行完毕,执行完毕或者出现异常后返回结果。

五、总结

这种编程方式是一种思维的转变,让异步结构变得更清晰,前后关系也很清楚(都是A->B->C),可以把所有的异步代码放在一起写,不需要添加额外的异步执行结果判断变量。

但是需要一段时间去习惯这种写法,否则也会被其中各种匿名函数和api绕晕。


认证和授权(2)

前面介绍了认证和授权的主要流程,本篇重点说明pulsar授权信息的存储以及怎么结合第三方用户中心实现授权管理。

  1. 基于pulsar-admin的授权指令

关于cluster、broker、bookie、tenant、namespace、topic的命令。

具体可参考:https://pulsar.apache.org/pulsar-admin-cli/?version=2.8.0

  1. 授权信息存储

使用pulsar默认的授权管理类(org.apache.pulsar.broker.authorization.PulsarAuthorizationProvider),授权信息会保存到global-zookeeper中,路径如下:

[zk: 172.20.140.11:2184(CONNECTED) 5] ls -R /admin/policies /admin/policies /admin/policies/public /admin/policies/pulsar /admin/policies/tenant_c /admin/policies/tenant_vv /admin/policies/public/default /admin/policies/pulsar/system /admin/policies/tenant_vv/ns1

查看/admin/policies/tenant_vv/ns1的节点内容

{ “auth_policies”: { “destination_auth”: {}, “namespace_auth”: { “vv123”: [ “consume”, “produce” ] }, “subscription_auth_roles”: {} }, “backlog_quota_map”: {}, “bundles”: { “boundaries”: [ “0x00000000”, “0x40000000”, “0x80000000”, “0xc0000000”, “0xffffffff” ], “numBundles”: 4 }, “clusterDispatchRate”: {}, “clusterSubscribeRate”: {}, “deleted”: false, “encryption_required”: false, “is_allow_auto_update_schema”: true, “latency_stats_sample_rate”: {}, “offload_threshold”: -1, “properties”: {}, “publishMaxMessageRate”: {}, “replication_clusters”: [ “vv” ], “replicatorDispatchRate”: {}, “schema_auto_update_compatibility_strategy”: “Full”, “schema_compatibility_strategy”: “UNDEFINED”, “schema_validation_enforced”: false, “subscriptionDispatchRate”: {}, “subscription_auth_mode”: “None”, “subscription_expiration_time_minutes”: 0, “subscription_types_enabled”: [], “topicDispatchRate”: {} }

在auth_policies里可以看到给角色vv123分配了produce和consume权限。

  1. 授权实现思路

首先需要对所有需要权限的操作进行拦截,pulsar提供了如下两个接口:

// 处理连接认证的 org.apache.pulsar.broker.authentication.AuthenticationProvider

// 处理授权的 org.apache.pulsar.broker.authorization.AuthorizationProvider

定义一组需要进行权限管理的操作,具体如下:

定义好用户和操作之间的关系,并给每一个用户分配唯一的token标识

在一次连接中保存用户的token信息和权限,并定时更新权限

针对用户的每一次操作都根据token进行权限的验证

由此我们可以知道,授权管理的前提是有一个用户管理中心,管理中心负责用户的创建和权限的分配。客户端连接的时候去用户中心获取token信息,然后携带token连接到broker,broker在用户第一次连接是去管理中心获取用户的权限信息并缓存。最后就是对用户的操作进行权限的判断了。

  1. 用户信息管理中心

结合pulsar的常用操作,我们可以设计几张表保存用户信息和权限信息。


认证和授权(1)

1. 概述

本系列文章准备详细的说明pulsar的认证和授权流程,并结合市场上常见的主-主账号授权、主-子账号授权需求提供解决办法。

2. 整体结构

首先我们需要对pulsar有一个整体的认识,pulsar本身是一个分布式部署的消息订阅分发中间件,它主要包含三个组件:

zookeeper:负责配置管理

broker:对外提供服务,接收发布订阅请求

bookkeeper:负责消息的持久化

image-20210611184242420

3. 通信方式

pulsar提供了两种服务,一种是http的,主要负责处理创建tenant、namespace、topic和获取集群状态等信息;另外一种是基于netty写的tcp服务,主要用于接收客户端发送的消息和订阅请求。

http服务都在org.apache.pulsar.broker.admin包下,可以看到对于cluster、broker、tenant、namespace等都提供了对应的api操作接口。

tcp服务的核心处理类是org.apache.pulsar.broker.service.ServerCnx。

消息格式为TLV格式的二进制数据,每条消息的前4个字节为消息的总长度。

看下具体的消息格式:

image-20231007104802008

4. 认证处理逻辑

客户端和broker之间是TCP长连接,在客户端连接到broker后,broker会对客户端的合法性进行验证,如果不合法则断开连接,判断流程是:

  1. 判断是否开启了连接认证(conf/broker.conf:authenticationEnabled)
  2. 如果没有开启认证,则返回连接成功
  3. 如果开启了认证,则获取认证内容、认证客户端选择的服务端认证策略
  4. 如果服务端不支持客户端提供的认证策略,则返回认证失败
  5. 如果支持,则调用策略的认证方法(AuthenticationProvider.authenticate)
  6. 如果认证过程没有抛出异常,则返回认证成功,并保存认证结果(这里的认证结果就是role,后续会根据role对客户端的其他操作进行授权管理)
  7. 认证过程完成。

认证处理包含几个重要的接口

  • 服务端(broker):

    org.apache.pulsar.broker.authentication.AuthenticationProvider,核心方法如下:


@Override
public void initialize(ServiceConfiguration config) throws IOException {
// 初始化时使用,在broker启动的时候初始化。
}
@Override
public String getAuthMethodName() {
// 范围认证策略的名称,需要和客户端发送的名称保持一致。
}
@Override
public String authenticate(AuthenticationDataSource authData) throws AuthenticationException {
// 进行客户端认证,返回客户端的角色名称。
}
@Override
public void close() throws IOException {
// broker关闭时调用此方法。
}
  • 客户端:

    org.apache.pulsar.client.api.Authentication

    org.apache.pulsar.client.api.AuthenticationDataProvider,核心方法如下:

Authentication

@Override
public String getAuthMethodName() {
// 认证策略的名称。
}
@Override
public AuthenticationDataProvider getAuthData() throws PulsarClientException {
// 返回认证数据持有对象,即另外一个核心接口的实现类。
}
@Override
public void configure(Map<String, String> authParams) {
// 程序启动时调用,可以得到配置文件中的配置项。
}
@Override
public void start() throws PulsarClientException {
// 程序启动时调用
}
@Override
public void close() throws IOException {
// 程序停止时调用
}

AuthenticationDataProvider

@Override
public boolean hasDataForHttp() {
// http区是否有数据
}
@Override
public Set<Map.Entry<String, String>> getHttpHeaders() throws Exception {
// 获取http头信息,如果上述方法返回true,则这里要设置http header内容。然后broker端才能根据http header name获取到数据。
}
@Override
public boolean hasDataFromCommand() {
// 是否有命令数据
}
@Override
public String getCommandData() {
// 如果上述方法返回true,则这里要返回broker端需要的数据。
}

5. 授权处理逻辑

授权需要在客户端连接认证的基础上进行,根据连接认证完成后生成的role对后续的操作进行权限管理。

授权管理包含两部分:

  • 使用pulsar-admin管理集群时的权限验证(http协议)
  • 客户端连接到broker进行数据读写时的权限验证(tcp协议)

上述两部分授权的处理逻辑其实没有区别,都是先通过连接认证获取获取客户端的role,然后根据role判断客户端是否有对应操作的权限。由于上边已经说了role的获取途径,下面重点写下pulsar对于客户端的哪些操作进行了权限的判断。

image-20231007105427754

6. 自定义认证和授权

自定义认证和授权只需要实现前两节中列出的接口即可。

7. 第三方认证和授权中心

为了能更好的对客户端的权限进行管理,需要一个统一的第三方认证中心,记录tenant、namespace和topic的信息以及用户信息,并建立起用户和操作之间的权限关系。这样,在客户端连接到broker后,broker就可以根据客户端传递的用户信息对客户端操作进行权限验证。

8. 具体实现(不包含真正的权限验证部分,只是为了测试整体流程)

8.1 实现broker端认证接口

package auth.server;
import org.apache.pulsar.broker.ServiceConfiguration;
import org.apache.pulsar.broker.authentication.AuthenticationDataSource;
import org.apache.pulsar.broker.authentication.AuthenticationProvider;
import org.slf4j.Logger;
import org.slf4j.LoggerFactory;
import javax.naming.AuthenticationException;
import java.io.IOException;
import java.util.Set;
import java.util.concurrent.atomic.AtomicLong;
/**
* @function
* @date 2021/7/27 14:19
*/
public class VVAuthenticationProvider implements AuthenticationProvider {
private static final Logger log = LoggerFactory.getLogger(VVAuthenticationProvider.class);
private static final String methodName = "vv_auth_v2";
private AtomicLong seq = new AtomicLong();
private String header = "vv_auth";
@Override
public void initialize(ServiceConfiguration config) throws IOException {
log.info(methodName + " initialize" + ", seq=" + seq.incrementAndGet());
if (config == null) {
return;
}
Set<String> superRoles = config.getSuperUserRoles();
if (superRoles == null) {
return;
}
for (String role : superRoles) {
log.info(methodName + " initialize " + role + ", seq=" + seq.incrementAndGet());
}
}
@Override
public String getAuthMethodName() {
log.info(methodName + " getAuthMethodName");
return methodName;
}
@Override
public String authenticate(AuthenticationDataSource authData) throws AuthenticationException {
log.info(methodName + " authenticate" + ", seq=" + seq.incrementAndGet());
String roleToken = "unknown";
if (authData.hasDataFromCommand()) {
roleToken = authData.getCommandData();
} else if (authData.hasDataFromHttp()) {
roleToken = authData.getHttpHeader(header);
} else {
throw new AuthenticationException("Authentication data source does not have a role token");
}
log.info(methodName + " authenticate " + roleToken + ", seq=" + seq.incrementAndGet());
return roleToken;
}
@Override
public void close() throws IOException {
log.info(methodName + " close" + ", seq=" + seq.incrementAndGet());
}
}

8.2 实现客户端认证接口

 package auth.client;
import org.apache.pulsar.client.api.Authentication;
import org.apache.pulsar.client.api.AuthenticationDataProvider;
import org.apache.pulsar.client.api.PulsarClientException;
import org.slf4j.Logger;
import org.slf4j.LoggerFactory;
import java.io.IOException;
import java.util.Map;
/**
* @function
* @date 2021/7/27 14:00
*/
public class VVAuthentication implements Authentication {
private static final Logger log = LoggerFactory.getLogger(VVAuthentication.class);
private static final String methodName = "vv_auth_v2";
@Override
public String getAuthMethodName() {
log.info(methodName + " getAuthMethodName");
return methodName;
}
@Override
public AuthenticationDataProvider getAuthData() throws PulsarClientException {
log.info(methodName + " getAuthData");
return new VVAuthenticationDataProvider();
}
@Override
public void configure(Map<String, String> authParams) {
log.info(methodName + " configure");
if (authParams == null) {
return;
}
authParams.forEach((key, value) -> {
log.info(methodName + " configure " + key + "=" + value);
});
}
@Override
public void start() throws PulsarClientException {
log.info(methodName + " start");
}
@Override
public void close() throws IOException {
log.info(methodName + " close");
}
}

package auth.client;
import org.apache.pulsar.client.api.AuthenticationDataProvider;
import org.slf4j.Logger;
import org.slf4j.LoggerFactory;
import java.util.HashMap;
import java.util.Map;
import java.util.Set;
/**
* @function
* @date 2021/7/27 14:08
*/
public class VVAuthenticationDataProvider implements AuthenticationDataProvider {
private static final Logger log = LoggerFactory.getLogger(VVAuthenticationDataProvider.class);
private static final String methodName = "vv_auth_v2";
private String header = "vv_auth";
private String token = "vv-role";
@Override
public boolean hasDataForHttp() {
log.info(methodName + " hasDataForHttp");
return true;
}
@Override
public Set<Map.Entry<String, String>> getHttpHeaders() throws Exception {
log.info(methodName + " getHttpHeaders");
Map<String, String> headers = new HashMap<>();
headers.put(header, token);
return headers.entrySet();
}
@Override
public boolean hasDataFromCommand() {
log.info(methodName + " hasDataFromCommand");
return true;
}
@Override
public String getCommandData() {
log.info(methodName + " getCommandData");
return token;
}
}

8.3 修改conf/broker.conf配置文件


### --- Authentication --- ###
# Enable authentication
# 开启连接认证
authenticationEnabled=true
# Authentication provider name list, which is comma separated list of class names
# 自定义的broker端实现的处理类
authenticationProviders=auth.server.VVAuthenticationProvider
# Interval of time for checking for expired authentication credentials
authenticationRefreshCheckSeconds=60
# Enforce authorization
# 开启授权认证
authorizationEnabled=true
# Authorization provider fully qualified class-name
# 自定义的授权认证处理类
authorizationProvider=auth.server.VVPulsarAuthorizationProvider
# Allow wildcard matching in authorization
# (wildcard matching only applicable if wildcard-char:
# * presents at first or last position eg: *.pulsar.service, pulsar.service.*)
authorizationAllowWildcardsMatching=false
# Role names that are treated as "super-user", meaning they will be able to do all admin
# operations and publish/consume from all topics
# 超级用户,创建tenant的时候需要超级用户
superUserRoles=vv-role,cc-role
# Authentication settings of the broker itself. Used when the broker connects to other brokers,
# either in same or other clusters
brokerClientTlsEnabled=false
# 自定义的客户端认证实现类
brokerClientAuthenticationPlugin=auth.client2.client.VVAuthentication
brokerClientAuthenticationParameters=
brokerClientTrustCertsFilePath=

8.4 重启broker

./bin/pulsar-daemon stop broker

./bin/pulsar-daemon start broker

8.5 验证是否有效

通过pulsar-admin命令进行验证

首先配置conf/client.conf文件

authPlugin=auth.client2.client.VVAuthenticationauthParams=

执行命令并验证结果

# 执行以下命令./bin/pulsar-admin tenants list# 客户端侧输出日志18:21:52.173 [main] INFO  auth.client.VVAuthentication - vv_auth_v2 configure18:21:52.175 [main] INFO  auth.client.VVAuthentication - vv_auth_v2 configure token=123456vv18:21:52.335 [main] INFO  auth.client.VVAuthentication - vv_auth_v2 getAuthMethodName18:21:52.336 [main] INFO  auth.client.VVAuthentication - vv_auth_v2 start18:21:52.611 [main] INFO  auth.client.VVAuthentication - vv_auth_v2 getAuthData18:21:52.612 [main] INFO  auth.client.VVAuthenticationDataProvider - vv_auth_v2 hasDataForHttp18:21:52.789 [main] INFO  auth.client.VVAuthenticationDataProvider - vv_auth_v2 hasDataForHttp18:21:52.789 [main] INFO  auth.client.VVAuthenticationDataProvider - vv_auth_v2 getHttpHeaders# 服务端(broker)侧输出日志18:23:53.957 [pulsar-web-41-11] INFO  auth.server.VVAuthenticationProvider - vv_auth_v2 authenticate, seq=329618:23:53.957 [pulsar-web-41-11] INFO  auth.server.VVAuthenticationProvider - vv_auth_v2 authenticate vv-role, seq=329718:23:53.958 [pulsar-web-41-11] INFO  org.eclipse.jetty.server.RequestLog - x.x.x.x - - [29/Jul/2021:18:23:53 +0800] "GET /admin/v2/tenants HTTP/1.1" 200 42 "-" "Pulsar-Java-v2.8.0" 1# 在pulsar-admin侧可以看到输出的tenant列表"public""pulsar""tenant_c""tenant_vv"

通过java程序验证

package auth;
import auth.client.VVAuthentication;
import org.apache.pulsar.client.api.*;
import org.slf4j.Logger;
import org.slf4j.LoggerFactory;
/**
* @function
* @date 2021/7/19 10:47
*/
public class AuthTest {
private static final Logger log = LoggerFactory.getLogger(AuthTest.class);
public static void main(String[] args) throws Exception {
AuthTest main = new AuthTest();
main.run();
}
String pulsarUrl = "pulsar://x.x.x.x:6650";
String topic = "persistent://tenant_vv/ns1/auth_test";
Authentication authentication = new VVAuthentication();
void run() throws Exception {
PulsarClient client = PulsarClient.builder()
.authentication(authentication)
.serviceUrl(pulsarUrl)
.build();
// send(client);
// testReader(client);
consume(client);
System.out.println("connect successed ");
client.close();
}
void consume(PulsarClient client) throws Exception {
Consumer consumer = client.newConsumer()
.topic(topic)
.subscriptionName("consumer-test")
.subscribe();
while (true) {
Message m = consumer.receive();
if (m != null) {
log.info("recv " + new String(m.getData()));
consumer.acknowledge(m);
} else {
break;
}
}
}
void send(PulsarClient client) throws Exception {
Producer p = client.newProducer()
.topic(topic)
.create();
for (int i=0; i<10; i++) {
p.newMessage().key("aaa").value(("hello " + i).getBytes()).send();
log.info("send " + i);
Thread.sleep(1000);
}
p.flush();
p.close();
System.out.println("send done");
}
void testReader(PulsarClient client) throws Exception {
Reader reader = client.newReader()
.subscriptionName("reader-test")
.topic(topic)
.startMessageId(MessageId.earliest)
// .startMessageId(DefaultImplementation.newMessageId(121493, -1, -1))
.create();
while (reader.hasMessageAvailable()) {
Message msg = reader.readNext();
log.info("reader recv msg, id=" + msg.getMessageId() + " key=" + msg.getKey() + ", value=" + new String(msg.getData()));
}
reader.close();
}
}

认证和授权(0)

pulsar认证说明

pulsar支持TLS、Athenz、Kerberos、JSON Web Token等认证,也支持自定义认证。

pulsar基于Netty进行数据的通信,通信内容的格式是TLV。服务端处理数据的类是org.apache.pulsar.broker.service.ServerCnx,客户端处理数据的类是org.apache.pulsar.client.impl.ClientCnx,这两个类都继承PulsarDecoder,在PulsarDecoder中区分各种type,然后根据type调用各种业务处理,在CONNECT中处理认证。

可以看下pulsar中的消息类型:

case PARTITIONED_METADATA
case PARTITIONED_METADATA_RESPONSE
case LOOKUP
case LOOKUP_RESPONSE
case ACK
case ACK_RESPONSE
case CLOSE_CONSUMER
case CLOSE_PRODUCER
case CONNECT
case CONNECTED
case ERROR
case FLOW
case MESSAGE
case PRODUCER
case SEND
case SEND_ERROR
case SEND_RECEIPT
case SUBSCRIBE
case SUCCESS
case PRODUCER_SUCCESS
case UNSUBSCRIBE
case SEEK
case PING
case PONG
case REDELIVER_UNACKNOWLEDGED_MESSAGES
case CONSUMER_STATS
case CONSUMER_STATS_RESPONSE
case REACHED_END_OF_TOPIC
case GET_LAST_MESSAGE_ID
case GET_LAST_MESSAGE_ID_RESPONSE
case ACTIVE_CONSUMER_CHANGE
case GET_TOPICS_OF_NAMESPACE
case GET_TOPICS_OF_NAMESPACE_RESPONSE
case GET_SCHEMA
case GET_SCHEMA_RESPONSE
case GET_OR_CREATE_SCHEMA
case GET_OR_CREATE_SCHEMA_RESPONSE
case AUTH_CHALLENGE
case AUTH_RESPONSE
case NEW_TXN
case NEW_TXN_RESPONSE
case ADD_PARTITION_TO_TXN
case ADD_PARTITION_TO_TXN_RESPONSE
case ADD_SUBSCRIPTION_TO_TXN
case ADD_SUBSCRIPTION_TO_TXN_RESPONSE
case END_TXN
case END_TXN_RESPONSE
case END_TXN_ON_PARTITION
case END_TXN_ON_PARTITION_RESPONSE
case END_TXN_ON_SUBSCRIPTION
case END_TXN_ON_SUBSCRIPTION_RESPONSE

pulsar认证实现步骤

pulsar的认证很简单,下面两个步骤就可以完成。

  1. 分别实现org.apache.pulsar.client.api.Authentication和org.apache.pulsar.broker.authentication.AuthenticationProvider接口,第一个用户客户端侧认证,第二个用户服务端侧认证。
  2. 修改conf/broker.conf文件,开启认证功能。
# Enable authentication
authenticationEnabled=true
# Authentication provider name list, which is comma separated list of class names
authenticationProviders=auth.server.VVAuthenticationProvider
# Interval of time for checking for expired authentication credentials
authenticationRefreshCheckSeconds=60
# Role names that are treated as "super-user", meaning they will be able to do all admin
# operations and publish/consume from all topics
superUserRoles=vv-role,cc-role
# Authentication settings of the broker itself. Used when the broker connects to other brokers,
# either in same or other clusters
brokerClientTlsEnabled=false
brokerClientAuthenticationPlugin=auth.client2.client.VVAuthentication
brokerClientAuthenticationParameters=
brokerClientTrustCertsFilePath=

需要注意的是,broker和client之间有认证,broker和broker之间也有认证,所以在自己实现的认证接口中需要区分角色,以免造成数据处理问题。

pulsar授权说明

pulsar认证和授权是分开的,认证部分用于验证客户端是否合法,授权部分则是细分了各个客户端的权限,包含tenant、namespace、topic操作权限等。授权部分和认证部分虽然是分开的,但是授权是基于角色进行的,而角色是由认证部分生成的,所以要开启授权的前提是先开启认证。

pulsar授权实现步骤

  1. 实现org.apache.pulsar.broker.authorization.AuthorizationProvider接口
  2. 修改conf/broker.conf文件,开启授权功能。
# Enforce authorization
authorizationEnabled=true
# Authorization provider fully qualified class-name
authorizationProvider=auth.server.VVPulsarAuthorizationProvider

# Allow wildcard matching in authorization
# (wildcard matching only applicable if wildcard-char:
# * presents at first or last position eg: *.pulsar.service, pulsar.service.*)
authorizationAllowWildcardsMatching=false

# Role names that are treated as "super-user", meaning they will be able to do all admin
# operations and publish/consume from all topics
superUserRoles=vv-role,cc-role